Apr 20, 2019
We talk about prototyping a lot at Flit. That’s because, after 3 years of developing a lightweight folding ebike for urban commuters, we have a lot of ideas and constantly need to test them. In this blog we wanted to show you a bit more about what goes on behind the scenes.
NO IDEA IS A BAD IDEA (UNTIL IT IS)
We have new ideas all the time. They can come from anywhere: an evolution of an existing part, being inspired by something happening in another industry, or having a spontaneous idea while riding home. When someone brings a new idea into the team we like to keep an open mind and not label it a bad idea too quickly, for the simple reason that you never know when a design that appears unusual at first will influence another part of the ebike later on. But we do need to narrow the list of ideas down so that it is manageable. The first way that we do this is to split ideas into two groups: those that we can look into now with the resources that we have, and those that we can save for later when we can tackle more complex projects.
Immediately addressable ideas need to be narrowed down further. The wrong way to do this would be to go straight to full prototyping which often involves specialist equipment like CNC mills that we don’t have at our immediate disposal. 3D printing, on the other hand, is perfect for building parts and testing them quickly. This is because over the past couple of decades 3D printers have gone from specialist manufacturing equipment to something that you can keep in your home or office. We have two 3D printers in the office: a Flashforge Finder and a Creality CR10S Pro. We use the Flashforge for smaller, more detailed prints, and the Creality for larger prints. These allow us to go from having an idea to making physical parts to test in a matter of hours or days, and at the cost of only a few hours of design and a modest amount of printing filament.

For example, we have a couple of hinges on our folding frame that must be clamped shut when the ebike is unfolded. We were interested to test what the most user friendly handle would be to close these clamps quickly. First, each of us came up with ideas for shapes (see the photo above). There was a lot of variety, from one that resembled the handle of a water spigot, to another that looked suspiciously like Super Mario’s moustache. We printed all of the ideas and, once we started testing them on a prototype frame, a clear winner emerged in a s-shaped design that is both quick to turn and pleasingly simple. At this point we could say that some of the designs were bad ideas, but even some of these later inspired designs elsewhere on the ebike frame. For example, the design of the clover-shaped handle later influenced the shape of the steerer arms that connect the headset to the main body of the ebike.
TEST EVERYTHING
Seeing parts that we’ve envisaged come alive in CAD software is always exciting. We can rotate them and move them around on the screen to get a sense of how they work and fit together, but there are also a number of features that we can’t simulate effectively in CAD alone. A good example of this is cable routing, a particularly tricky problem on a folding ebike as cables have to be able to run across the frame without splitting or becoming kinked when the ebike is folded.
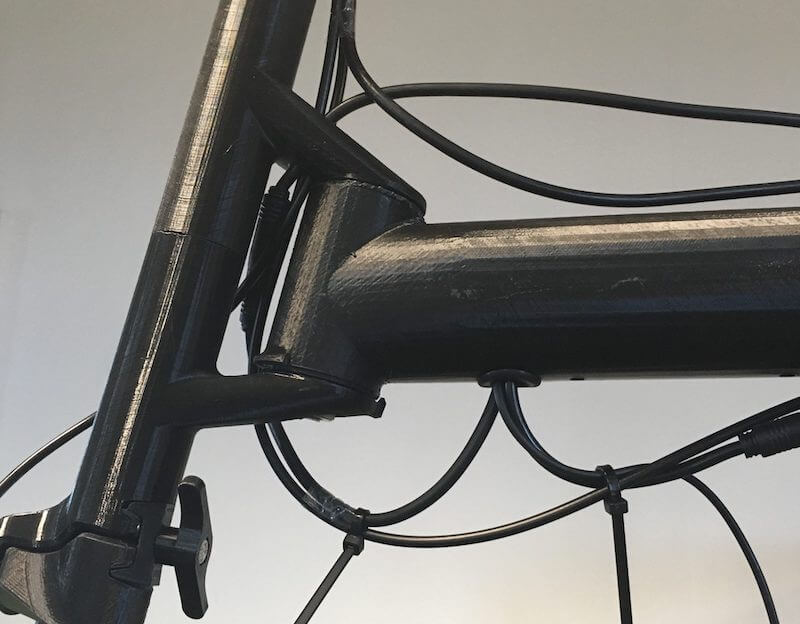
3D printing is a perfect solution for this kind of problem as we can make a full scale rig of the ebike, run cables along it, and then test how those cables react during folding. This then informs how we bundle the cables and anchor them to the frame to achieve a good balance of tidiness and protection from kinking and splitting. It also means that we can drill new holes and add anchor points to try new ideas quickly without damaging an expensive metal prototype.
Another example of where testing through 3D printing has been valuable is in the frame hinges (see photo below). Getting the design of the hinges correct is vital to our ebike’s fold as their position, angle, and feel all affect the appearance, safety, and usability of the ebike. Starting off with a large but rudimentary 3D print to demonstrate the general principle of how they would work, we have refined the complex shape of the hinges, their safety features, clamping surfaces and thread insert designs using successive 3D prints.
AVOID EXPENSIVE MISTAKES
The final reason we have focused so much on 3D printing recently is that it helps us to avoid costly errors. As we move closer to manufacturing and work with more suppliers, the chances of mistakes creeping in increase, as does the time it takes to put corrections through the whole supply chain. For example, if a modification is needed to part of the prototype frame, this could require making new tooling, sourcing raw material, coordinating multiple suppliers, and delivering finished parts to us for testing. This can take months, making it particularly important to catch mistakes as early as possible.
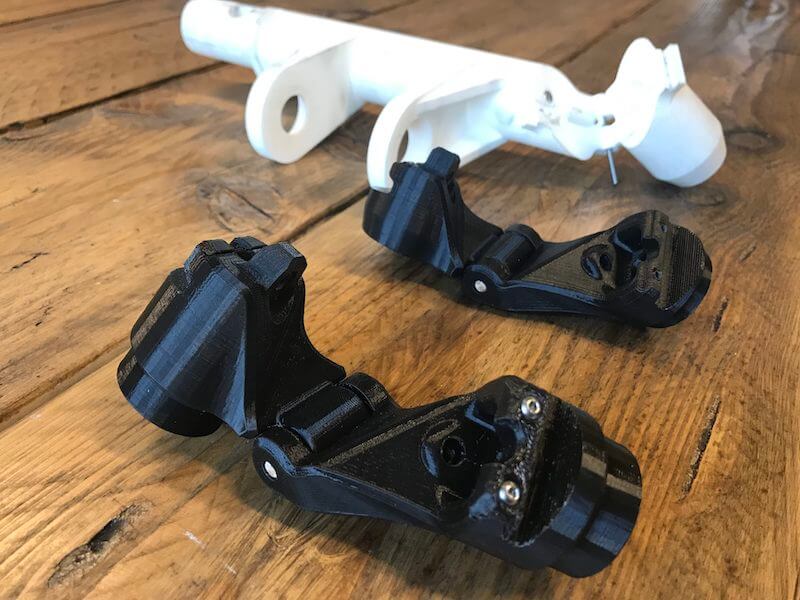
A good example of this is an error we made very early in the development process in the design of the suspension seat (this is the part of the rear frame which makes contact with the suspension block when the ebike is ridden). On our first prototype, the suspension seat wasn’t stiff enough and as a result it fatigued and cracked during mechanical testing (see pictures below; the initial design is on the left of each picture, improved design is on the right). As soon as we observed this problem and understood its causes, we were able to quickly redesign the suspension seat and build a new version as a 3D print. This allowed us to test the stiffness of the new design as well its fit with other parts of the frame such as the suspension block and the latch which holds the seat in place during riding.


As our appreciation of the usefulness of 3D printing has grown, we have used it more and more widely. Overall, we estimate that this has saved us thousands of pounds in development costs and many months in development time. It has turned us into real advocates for the technology.
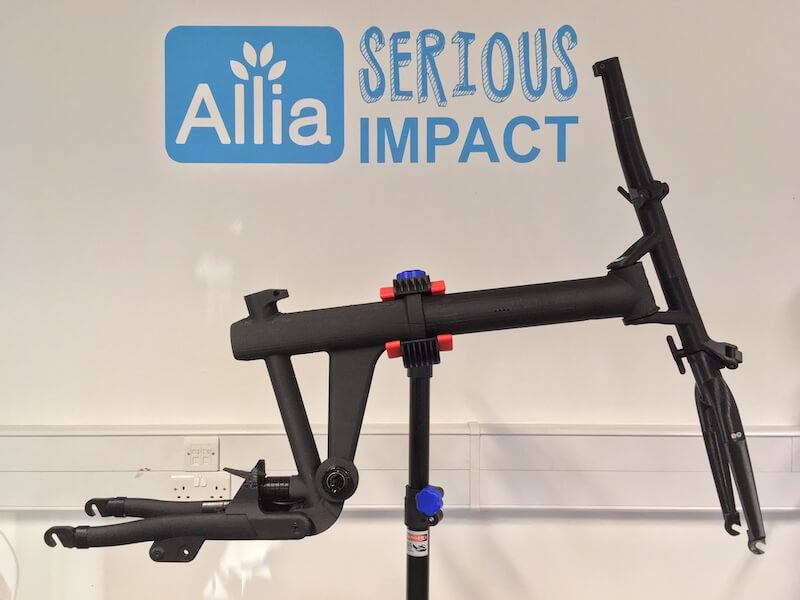
We’re expecting delivery of our next metal prototype in Cambridge in the coming days. In the meantime, here’s a picture of our latest 3D printed frame to give you an idea of how it will look. We’ve been using it to test the fold and the fit of the electrical system within the frame:
If you have any questions please feel free to get in touch.
Check back here or follow our Facebook,Instagram, or Twitter accounts to find out more!
Comments are closed.